Even New York City experiences the changing of the leaves. (These benches are one of my favorite parts of Central Park).
Fall in Central Park – ProjectEdit365 – 03 Nov
I brightened up the original just a little and added some warmth to it. I increased the contrast but decreased the clarity just a bit. Lowered the highlights and lightened the shadows. I used an adjustment brush on the sidewalk to increase its texture. I used a graduated filter on the lower fourth of the frame to increase the exposure. Here’s the original:
“Give me your tired, your poor
Your huddled masses yearning to breathe free
The wretched refuse of your teeming shore
Send these, the homeless, tempest-tost to me
I lift my lamp beside the golden door!”
– Emma Lazarus “The New Colossus”
This chandelier hangs in the registry hall at Ellis Island. I could stare at it and the brickwork for hours.
Ellis Island Chandelier – ProjectEdit365 – 02 Nov
The original was dull so I increased the contrast and clarity. I used a graduated filter on the lower portion of the ceiling to brighten it a bit. Here’s the original:
As a homeschooler, I say this with all the love in the world — it’s a blessing and a curse to be the one to teach your child to read. Maybe it’s only control freaks that have issues. I thought I would poke my eyes out with pencils before we got the hang of reading.
But you know what? She learned. And she’s reading up a storm now. Here she was, learning about initial sounds.
Learning to Read – ProjectEdit365 – 01 Nov
There’s so much going on the pic, I made it black and white to take away some of the distraction. I love the busyness though because it almost all relates to her. The babydoll, the bike. I increased the contrast and clarity, lightened the exposure and highlights. Here’s the original:
Another month is in the books! I can’t believe that I’ve been editing and posting a picture every day for nine months (I started in February). If you don’t yet know about my Project Edit 365, or if you’re wondering why I’m posting one picture every day, then go learn about Project Edit 365!
The girls enjoy drawing on the pumpkins more than carving them.
Trick or Treat – ProjectEdit365 – 31 Oct
I had been practicing with my flash when I took this picture, and I’m not pleased with what it did. So I made it black and white. I cropped in to put more focus on the girls. I increased the contrast and clarity and messed with the tone curve to make the picture matte. I decreased the highlights and whites and darkened the blacks just a bit. I added a small vignette. Oh, and I cropped out the outlet on the wall. Here’s the original:
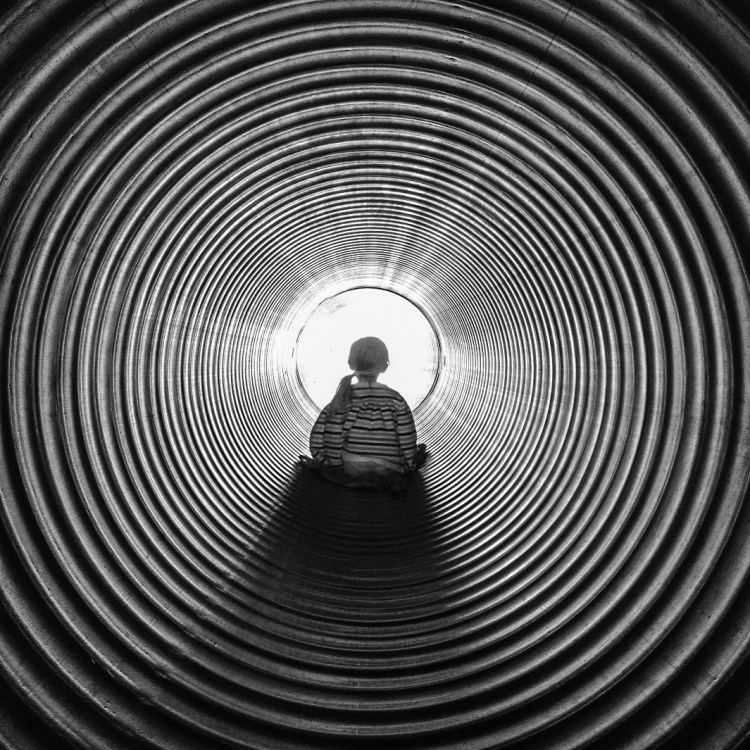
All I can say is, I couldn’t stare at this too long. I started feeling woozy!
This was taken at a corn maze when my girls were younger.
Trippin’ – ProjectEdit365 – 30 Oct
The original was pretty much just as trippy. I just wanted to make a few adjustments. I cropped to a square for graphic purposes. I dropped the saturation down to zero, increased the clarity by a lot and the contrast by a little. I also decreased the highlights just a little. Here’s the original:
There are *so* many things to see and do the Northern Virginia area – for traveling and homeschooling. Whether you’re into nature, history, culture, current affairs, sports, you name it. The DMV area has it.
As a historical homeschool trip, we visited Claude Moore Colonial Farm in McLean. It recreates what a small farm would have been like during colonial times. Walking the walk and talking the talk.
Claude Moore Colonial Farm – ProjectEdit365 – 29 Oct
Yesterday, I made the comment that I didn’t know how to recreate the preset from Coffeeshop Blog that I like so much. So, I spent some time on her blog last night, and lo and behold, she has tutorials. And one of them is how to get the “matte effect”. SCORE. I love the look that it gives to many photos. So, to edit, I went straight to the tone curve slider and it worked its magic. It does darken the picture so I lightened the shadows. The man standing in the doorway of the barn was distracting, so I used an adjustment brush on him and completely lowered the exposure. Thankfully that area was already dark. I moved the tint slider a little towards magenta and the temp slider a little towards blue. I used a graduated filter to bring in some warmer light from the upper left corner. Then I used an adjustment brush to sharpen their eyes. Here’s the original: